Powered By Blogger
Showing posts with label daring bakers. Show all posts

Tuesday, January 6, 2009

failure

I think I need to admit it. I'm not a daring baker.

I tried, really I did. But the recipes are always so long and complicated and need a piece of equipment I don't have and make quantities of food I can't consume. It's not that I don't have the right skills to make them, or that I'm not prepared to buy the gee-gaw that I need, it's just that I run out of time and make the month's challenge in a rush and panic and therefore don't enjoy it. And I enjoy being in my kitchen most of the time.

So after I post this I'm emailing the fine ladies who do a wonderful job running the show and taking my name off the blogroll.

My grate (sic) mate JC came to the conclusion that she's not a daring baker some time ago. So we're starting our own challenge. We're not sure what yet, but next Christmas it will be a gingerbread house.

I'm going to suggest we work our way through the un-made recipes in our 'cook this' folders in our favourites. Or choose a different blog each month and cook something off that (my first votes are for the wonder Joy at Joy the Baker, followed closely by the insanely witty and wonderful Garret at Vanilla Garlic, and then the gorgeous Marilla at Cupcake Rehab. Visit their sites, cook their stuff today is my advice to you). Maybe then we can just pick someone from their blogrolls and do something from there next.

And what's great is that there's no rush or pressure. We get it done when we get it done, and we can pick exactly what we want - although there will be a battle because JC will want sweet and I will want savoury, but I'm sure we'll work that out.

On a personal note, today was not as good as yesterday, but was still pretty good. I was in meetings until nearly noon. Noon people!!! How can my colleagues talk so much! But I feel like I'm getting on top of stuff finally in the new job.

Sunday, November 30, 2008

the pudding has been eaten, now for the proving

Well the caramel cake below was certainly full of caramel. I took Marilla from Cupcake Rehab's idea of drizzling the left over syrup over the time, and it certainly looked really pretty.

The cake itself was light and very very nice. I think I cooked my syrup a little too long and it was more toffee than caramel, but I like toffee nearly as much as I like caramel so that's OK. The icing however was way, way over the top. Far too sweet and far too much of it. If I were doing this again I would probably make half the amount of icing and spread it thin and flat. I've seen a couple of people who have done cupcakes, and this might cut through the sweetness a bit. Lainie-bird and I ate a small piece each (left most of the icing) then the rest went down to Princess for her clan. They'll polish the rest off, no worries!

But I do have an awful amount of syrup left over. If you've done this challenge and have worked out what you're doing with the leftovers, suggestions are most welcome. I reckon there's a Christmas gift in there somewhere!

You'll also see below that the fonts went crazy on this post. This also happened with the pizza last month. So this time I copied and pasted the recipe into word and then back into my post, but it still didn't like it. Don't know whether I should work out how to fix this or just live with it. The later most likely!

daring bakers - caramel cake


There's been a lot of non-food talk on this site over the past little bit, so Daring Bakers have pulled my up by my bootstraps and got me into the kitchen at last. This month's DB is a Caramel Cake with Caramelized Butter Frosting. And first up, in line with the new DB rules, let me get the credits outta the way. This month's hostess with the mostest is Delores from Chronicles in Culinary Curiosity, with co-hosts Alex from Blondie and Brownie and Jenny of Foray into Food. The recipe itself is from Shuna Fish Lydon from Eggbeater, but this particular recipe is available on Bay Area Bites. You can go straight to this link to get the recipe, but I've broken from my usual practice of relying on lazy links, and have tirelessly typed it out, to make it all metric for those so inclined.

Carmamel Cake with Carmaelised Butter Icing

Caramel Syrup

2 cups sugar
1/2 cup water
1 cup water (for "stopping" the caramelisation
process)
In a small stainless steel saucepan, with tall sides, mix water and sugar until mixture feels like wet sand. Brush down any stray sugar crystals with wet pastry brush. Turn on heat to highest flame. Cook until smoking slightly: dark amber.

When colour is achieved, very carefully pour in one cup of water. Caramel will jump and sputter about! It is very dangerous, so have long sleeves on and be prepared to step back.

Whisk over medium heat until it has reduced slightly and feels s
ticky between two fingers. {Obviously wait for it to cool on a spoon before touching it.}

Note: For safety reasons, have ready a bowl of ice water to plunge your hands into if any caramel should land on your skin.

These are my before and after syrup photos.


The Cake

140g unsalted butter at room temperature
1 1/4 Cups granulated sugar
1/2 teaspoon kosher salt
1/3 Cup Caramel Syrup (see recipe above)
2 each eggs, at room temperature
splash vanilla extract
2 Cups all-purpose flour
1/2 teaspoon ba
king powder
1 cup milk, at room temperature
Preheat oven to 350F

Butter one tall (2 – 2.5 inch deep) 9-inch cake pan.

In the bowl of a stand mixer fitted with a paddle attachment, cream butter until smooth. Add sugar and salt and cream until light and fluffy.

Slowly pour room temperature caramel syrup into bowl. Scrape down bowl and increase speed. Add eggs/vanilla extract a little at a time, mixing well after each addition. Scrape down bowl again, beat mixture until light and uniform.

Sift flour and baking powder.

Turn mixer to lowest speed, and add one third of the dry ingredients. When incorporated, add half of the milk, a little at a time. Add another third of the dry ingredients, then the other half of the milk and finish with the dry ingredients. {This is called the dry, wet, dry, wet, dry method in cake making. It is often employed when there is a high proportion of liquid in the batter.}

Take off mixer and by hand, use a spatula to do a few last folds, making sure batter is uniform. Turn batter into prepared cake pan.

Place cake pan on baking tray. Set first timer for 30 minutes, rotate pan and set timer for another 15-20 minutes. Your own oven will set the pace. Bake until sides pull away from the pan and skewer inserted in middle comes out clean. Cool cake completely before icing it.

Cake will keep for three days outside of the refrigerator.

Caramelised Butter Icing

170g unsalted butter
450g icing sugar, sifted
4-6 tablespoons heavy cream
2 teaspoons vanilla extract
2-4 tablespoons caramel syrup
Kosher or sea salt to taste
Cook butter until brown. Pour through a fine meshed sieve into a heatproof bowl, set aside to cool.
Pour cooled brown butter into mixer bowl.
In a stand mixer fitted with a paddle or whisk attachment, add icing sugar a little at a time. When mixture looks too chunky to take any more, add a bit of cream and or caramel syrup. Repeat until mixture looks smooth and all icing sugar has been incorporated. Add salt to taste.


Now, I've been a little late posting this, so I have to admit I haven't tried it yet, there will be guests arriving in about an hour and this will be our desert. What I have tasted (batter and icing) is pretty darn fine. Caramel is a favourite flavour of mine, and this has it in spades. The cake took much longer than expected to cook, so I hope it's OK in the centre.

This was dead easy to get together, even with the three seperate bits. My only advice is that unless you have multiple uses for it, half the syrup recipe, as it produces buckets of the stuff.

I will let you all know later tonight how the proof of the pudding went.

Sunday, August 31, 2008

daring bakers - eclairs

Having missed last months DB challenge I was very much looking forward to making eclairs, but there was some trepidation regarding the choux pastry and my ability to pull off such a monster.

However, the fear was unfounded and the pastry itself was actually really easy to make, although the adding the flour to the pan was rather odd.

Then came the piping. I've never claimed to be an accomplished piper. There was affirmation of my novice status. the eclair shaped ones were funny little worms with tiny, tiny little tails. So i decided to make some balls. The dough was already in the piping bag. So instead of doing the sensible thing and taking it out and spooning out the balls, i decided to pipe them - despite the fact that I already worked out that I was not good at this!!!

The looked fine. They cooked fine. However because I'd piped them they were hollow on the bottom.

d'oh

It was OK though! I didn't actually make the cream filling (despite many reports that it is deeeelicious), but did the icing top and just filled them, like little pastry spoons bringing a mouthful of liquid chocolate my way!


I was going to have another go this weekend, but the long list of wineries I have to visit stretched on in front of me, and as we speak I'm making a chocolate caramel cheesecake for a do at work on Tuesday. So this is the most complete photo I have. If you'd like to take a better photo, you'll need the full recipe.

However, it's very long and rather involved, so I won't replicate it here. But I'm sure a quick look at the Daring Baker's blogroll will give you hundreds of links to the full recipe!!

Thursday, July 31, 2008

sigh of relief

I suspect a lot of people have been coming here over the last couple of days looking for my daring bakers post.

Sorry folks, there ain't one.

As you may have read a few weeks ago my cat Hester (known to those who love him - like me - as Mr Poo) was very sick. Well, Poo died a couple of weeks ago and there have been lots of tears chez BHG.

So I took my other cat Thurston (aka Birdie. Yes, I realise my cats have strange nicknames), to the vet to work out a diet for him. He was always partial to pushing Poo aside and finishing off his dinner. So he's always been a little, well, generous around the waist. Just like his mum really.

Anyway Bird's blood sugars were off the scale. There have been lots of tests, and lots of credit card transactions since then Tonight the word came through that although he's diabetic, the vet things he's been diagnosed early, and has a pretty good chance of having his sugars levelling out and him living as long as he should. It's twice daily insulin injections, but even they are nearly as expensive as I though they would be, although I would pay what ever it cost in a heartbeat.

On top of that I've been appointed to a project team to write a new strategic plan and organise the community consultation for same (something I have zero experience in), and have also taken on a major, major project with uni. However that latter is assessing the wine tourism industry in the Adelaide Hills and Barossa Valley, so that's slightly more exciting than strategic plans.

Anyhoo, as you can see one thing has led to another and baking complicated layer cakes has not been on the agenda recently.

Here are some random links to people who actually got it together:

BC at Beans and Caviar, what a great name
Karen at Do Better also has a fantastic header to her page (although she mentions exercise which causes me anxiety)
Elsepeth at So Familiar A Gleam completed her first challenge and has a kick arse name. Go Elespeth!

Also in my journey through the blog roll I found many others like me who hadn't managed the July challenge.

I did come across Caviar and Codfish. Who would have though I would have clicked on two blogs with Caviar in the title, but it was totally random. There are some great recipes and photos here, but most unusually one for pickled tongue. Just like in The Famous Five. Not something you really see anymore, so have a look, although I warn you the pictures are quite ... ... ... anatomically obvious.

So, in closing, thanks again to all of those who have sent kisses to Poo, Bird and BHG. Bird and I are looking forward to lots of years to go, and the August DB challenge!!!!

Sunday, June 29, 2008

daring bakers - apple and ricotta danish

After a night at the opera last month, I said to a fellow DB’er, Danish would be good.

Voila – Danish. No - seriously.

This took some getting together in terms of time, but was pretty straight forward. Here is the recipe provided by Kellypea at Sass and Veracity for the challenge (BTW: check out Kellypea’s recipe for buttery garlic knots. Looks fabbo to me!):

Hang on, it’s a long one!!!

DANISH DOUGH
Makes 2-1/2 pounds dough

Ingredients
For the dough (Detrempe)
1 ounce fresh yeast or 1 tablespoon active dry yeast
1/2 cup whole milk
1/3 cup sugar
Zest of 1 orange, finely grated
3/4 teaspoon ground cardamom
1-1/2 teaspoons vanilla extract
1/2 vanilla bean, split and scraped
2 large eggs, chilled
1/4 cup fresh orange juice
3-1/4 cups all-purpose flour
1 teaspoon salt

For the butter block (Beurrage)
1/2 pound (2 sticks) cold unsalted butter
1/4 cup all-purpose flour

DOUGH
Combine yeast and milk in the bowl of a mixer fitted with the paddle attachment and mix on low speed. Slowly add sugar, orange zest, cardamom, vanilla extract, vanilla seeds, eggs, and orange juice. Mix well. Change to the dough hook and add the salt with the flour, 1 cup at a time, increasing speed to medium as the flour is incorporated. Knead the dough for about 5 minutes, or until smooth. You may need to add a little more flour if it is sticky. Transfer dough to a lightly floured baking sheet and cover with plastic wrap. Refrigerate for 30 minutes.

Without a standing mixer: Combine yeast and milk in a bowl with a hand mixer on low speed or a whisk. Add sugar, orange zest, cardamom, vanilla extract, vanilla seeds, eggs, and orange juice and mix well. Sift flour and salt on your working surface and make a fountain. Make sure that the “walls” of your fountain are thick and even. Pour the liquid in the middle of the fountain. With your fingertips, mix the liquid and the flour starting from the middle of the fountain, slowly working towards the edges. When the ingredients have been incorporated start kneading the dough with the heel of your hands until it becomes smooth and easy to work with, around 5 to 7 minutes. You might need to add more flour if the dough is sticky.

BUTTER BLOCK
1. Combine butter and flour in the bowl of a mixer fitted with a paddle attachment and beat on medium speed for 1 minute. Scrape down the sides of the bowl and the paddle and then beat for 1 minute more, or until smooth and lump free. Set aside at room temperature.
2. After the detrempe has chilled 30 minutes, turn it out onto a lightly floured surface. Roll the dough into a rectangle approximately 18 x 13 inches and ¼ inch thick. The dough may be sticky, so keep dusting it lightly with flour. Spread the butter evenly over the center and right thirds of the dough. Fold the left edge of the detrempe to the right, covering half of the butter. Fold the right third of the rectangle over the center third. The first turn has now been completed. Mark the dough by poking it with your finger to keep track of your turns, or use a sticky and keep a tally. Place the dough on a baking sheet, wrap it in plastic wrap, and refrigerate for 30 minutes.
3. Place the dough lengthwise on a floured work surface. The open ends should be to your right and left. Roll the dough into another approximately 13 x 18 inch, ¼-inch-thick rectangle. Again, fold the left third of the rectangle over the center third and the right third over the center third. No additional butter will be added as it is already in the dough. The second turn has now been completed. Refrigerate the dough for 30 minutes.
4. Roll out, turn, and refrigerate the dough two more times, for a total of four single turns. Make sure you are keeping track of your turns. Refrigerate the dough after the final turn for at least 5 hours or overnight. The Danish dough is now ready to be used. If you will not be using the dough within 24 hours, freeze it. To do this, roll the dough out to about 1 inch in thickness, wrap tightly in plastic wrap, and freeze. Defrost the dough slowly in the refrigerator for easiest handling. Danish dough will keep in the freezer for up to 1 month.


APPLE FILLING
Makes enough for two braids

Ingredients
4 Fuji or other apples, peeled, cored, and cut into ¼-inch pieces
1/2 cup sugar
1 tsp. ground cinnamon
1/2 vanilla bean, split and scraped
1/4 cup fresh lemon juice
4 tablespoons unsalted butter

Toss all ingredients except butter in a large bowl. Melt the butter in a sauté pan over medium heat until slightly nutty in color, about 6 - 8 minutes. Then add the apple mixture and sauté until apples are softened and caramelized, 10 to 15 minutes. If you’ve chosen Fujis, the apples will be caramelized, but have still retained their shape. Pour the cooked apples onto a baking sheet to cool completely before forming the braid. (If making ahead, cool to room temperature, seal, and refrigerate.) They will cool faster when spread in a thin layer over the surface of the sheet. After they have cooled, the filling can be stored in the refrigerator for up to 3 days. Left over filling can be used as an ice cream topping, for muffins, cheesecake, or other pastries.

DANISH BRAID
Makes enough for 2 large braids

Ingredients
1 recipe Danish Dough
2 cups apple filling, jam, or preserves

For the egg wash: 1 large egg, plus 1 large egg yolk

1. Line a baking sheet with a silicone mat or parchment paper. On a lightly floured surface, roll the Danish Dough into a 15 x 20-inch rectangle, ¼ inch thick. If the dough seems elastic and shrinks back when rolled, let it rest for a few minutes, then roll again. Place the dough on the baking sheet.
2. Along one long side of the pastry make parallel, 5-inch-long cuts with a knife or rolling pastry wheel, each about 1 inch apart. Repeat on the opposite side, making sure to line up the cuts with those you’ve already made.
3. Spoon the filling you’ve chosen to fill your braid down the center of the rectangle. Starting with the top and bottom “flaps”, fold the top flap down over the filling to cover. Next, fold the bottom “flap” up to cover filling. This helps keep the braid neat and helps to hold in the filling. Now begin folding the cut side strips of dough over the filling, alternating first left, then right, left, right, until finished. Trim any excess dough and tuck in the ends.

Egg Wash
Whisk together the whole egg and yolk in a bowl and with a pastry brush, lightly coat the braid.

Proofing and Baking
1. Spray cooking oil onto a piece of plastic wrap, and place over the braid. Proof at room temperature or, if possible, in a controlled 90 degree F environment for about 2 hours, or until doubled in volume and light to the touch.
2. Near the end of proofing, preheat oven to 400 degrees F. Position a rack in the center of the oven.
3. Bake for 10 minutes, then rotate the pan so that the side of the braid previously in the back of the oven is now in the front. Lower the oven temperature to 350 degrees F, and bake about 15-20 minutes more, or until golden brown. Cool and serve the braid either still warm from the oven or at room temperature. The cooled braid can be wrapped airtight and stored in the refrigerator for up to 2 days, or freeze for 1 month.

Wow, that’s a mouth full. Here’s what went wrong for me:

Forgot to read the back of the last page of the recipe (where it talks about proving time) so didn’t leave enough for a wintery house, so it didn’t really rise at all.


Here’s what went right:

It’s pretty easy to do and totally, totally delicious, despite the proving issues. I use the recipe for apples for the filling, but put them on a bed of ricotta. Once again I took it to work and it got eaten in a second. Although some refused to believe I made the dough myself. Really…….

Wednesday, May 28, 2008

daring bakers - opera cake

if you've ever been to paris, you'll know that the opera garnier is a pretty funky place (with some great cafes near by). this month's daring baker's challenge was the opera cake. i hazard to guess that the fine inventor of this cake, whose name escapes me, thought it looked a bit like the baroque-esque features of this amazing building. if you'd like to make one, this is the way you would go about it:

An opera cake is layers of joconde (basically an almond meal and meringue sponge) soaked in surup and layered with lots of dairy fat. so there are a few pieces you'll need to get together:

the joconde
Ingredients

6 large egg whites, at room temperature
2 tbsp. (30 grams) caster sugar
2 cups (225 grams) ground blanched almonds
2 cups icing sugar, sifted
6 large eggs
½ cup (70 grams) all-purpose flour
3 tbsp. (1½ ounces; 45 grams) unsalted butter, melted and cooled

preheat the oven to 425◦F. (220◦C),and divide the oven space into third

line two 12½ x 15½- inch (31 x 39-cm) swiss-roll pans with parchment paper and brush with melted butter.

beat the egg whites until they form soft peaks. add the sugar and beat until the peaks are stiff and glossy. If you do not have another mixer bowl, gently scrape the meringue into another bowl and set aside.

if you only have one bowl, wash it after removing the egg whites or if you have a second bowl, use that one. Attach the paddle attachment to the stand mixer (or using a handheld mixer again) and beat the almonds, icing sugar and eggs on medium speed until light and voluminous, about 3 minutes.

add the flour and beat on low speed until the flour is just combined (be very careful not to overmix).

using a rubber spatula, gently fold the meringue into the almond mixture and then fold in the melted butter. Divide the batter between the pans and spread it evenly to cover the entire surface of each pan.

bake the cake layers until they are lightly browned and just springy to the touch. this could take anywhere from 5 to 9 minutes depending on your oven. place one swiss roll pan in the middle of the oven and the second in the bottom third of the oven. it may be necessary to swap the pans half way through the cooking process to ensure they cook evenly.

put the pans on a heatproof counter and run a sharp knife along the edges of the cake to loosen it from the pan. cover each with a sheet of parchment or wax paper, turn the pans over, and unmold.

carefully peel away the parchment, then turn the parchment over and use it to cover the cakes. let the cakes cool to room temperature.

the syrup
ingredients
½ cup (125 grams) water
⅓ cup (65 grams) granulated sugar
1 to 2 tbsp. of the flavouring of your choice (i used honey)

stir all the syrup ingredients together in the saucepan and bring to a boil.

remove from the heat and let cool to room temperature.

the buttercream
ingredients:
1 cup (100 grams) caster sugar
¼ cup (60 grams) water
seeds of one vanilla bean/vanilla extract/essence etc
1 large egg
1 large egg yolk
1¾ sticks (7 ounces; 200 grams) unsalted butter, at room temperature
flavouring of your choice (i used a couple of mashed up bananas)

combine the sugar, water and vanilla bean seeds or extract in a small saucepan and warm over medium heat just until the sugar dissolves.

continue to cook, without stirring, until the syrup reaches 225◦F (107◦C) on a candy or instant-read thermometer. once it reaches that temperature, remove the syrup from the heat.

while the syrup is heating, begin whisking the egg and egg yolk at high speed in the bowl of your mixer using the whisk attachment. whisk them until they are pale and foamy.

when the sugar syrup reaches the correct temperature and you remove it from the heat, reduce the mixer speed to low speed and begin slowly (very slowly) pouring the syrup down the side of the bowl being very careful not to splatter the syrup into the path of the whisk attachment. Some of the syrup will spin onto the sides of the bowl but don’t worry about this and don’t try to stir it into the mixture as it will harden!

raise the speed to medium-high and continue beating until the eggs are thick and satiny and the mixture is cool to the touch (about 5 minutes or so).

while the egg mixture is beating, place the softened butter in a bowl and mash it with a spatula until you have a soft creamy mass.

with the mixer on medium speed, begin adding in two-tablespoon chunks. When all the butter has been incorporated, raise the mixer speed to high and beat until the buttercream is thick and shiny. then add the banana

refrigerate the buttercream, stirring it often, until it’s set enough to spread when topped with a layer of cake (about 20 minutes).

white chocolate ganache/mousse
ingredients
7 ounces (200g) white chocolate
1 cup plus 3 tbsp. heavy cream (35% cream)
1 tbsp. liqueur of your choice (i sued frangelico)

Melt the white chocolate and the 3 tbsp. of heavy cream in a small saucepan. stir to ensure that it’s smooth and that the chocolate is melted. add the tablespoon of liqueur to the chocolate and stir. set aside to cool completely.

in a bowl of a stand mixer, whip the remaining 1 cup of heavy cream until soft peaks form. gently fold the whipped cream into the cooled chocolate to form a mousse.

if it’s too thin, refrigerate it for a bit until it’s spreadable.

the glaze (make just as you're getting the whole thing together - see below)
ingredients

14 ounces (400g) white chocolate, coarsely chopped
½ cup heavy cream (35% cream)

melt the white chocolate with the heavy cream. whisk the mixture gently until smooth.

let cool for 10 minutes and then pour over the chilled cake. using a long metal cake spatula, smooth out into an even layer. place the cake into the refrigerator for 30 minutes to set.

getting it all together
ok, this is the tricky bit. to start off with you need three layers of cake. 'but hey crazy lady' i hear you say, 'i only have two cakes'.

well yes, i know. so cut a third off the end off each cake. you now have two 2/3 cakes, and two 1/3 cakes. so you put the two 1/3s together and now you have 3 2/3 of a cake. hope that makes sense!

so you get a full piece of cake, drizzle it with a third of the syrup and then using a spatula spread out half of the butter cream.

now take the two ends that you cut off the cakes and place them together to make the new layer. again, drizzle with syrup and smooth over the butter cream.

put the last layer of cake on and drizzle with the last of the syrup. but this time spread the cream mousse over the top. make sure it's fairly even on the top and bung it in the fridge for several hours to get it really cold.

this is the time to start making the glaze, as per the instructions above. spread it all out over the cooled cake and smooth it off with your spatula. get it back in the fridge to set. once it's ready to serve just trim off the edges to expose the layers. these cut off bits make a really good alternative to beer when you come home from a late meeting all stressed and snipey.

et voila! mon gateau au opera!


overall mine was a great success. normally opera cake is make with dark chocolate, but the DB lasses made this one white as a celebration of spring. of course in australia it's lovely and crisp and frosty and autumn. i love autumn, so i'm quite happy to celebrate that instead.

the only problem with my execution of this was that the banana made the butter cream a bit soggy, and as i only have one pan i had to cook the layers of the jaconde separately, so they were a bit uneven when it came to putting it together. it was also a bit fiddly, but i'm sure the next time i make it, it will all be a bit more straight forward - although i did wash a gazzilion bowls!

this is certainly a special occasion cake, but worth a shot. cereal. i didn't actually get to eat any of it, because i took it to work and my 'friends' ate it all before i got a piece. the reports were good. i guess that's it settled, i will have to make it again. tee hee.

Sunday, April 27, 2008

daring bakers begin

i was trying to think of some cool title for this post, but the large amount of alcohol i had on friday is still playing with my brain i think, so i could come up with nothing. i know there's something about cheese out there dying to be used.

but this is my first daring bakers challenge, and thus my rather boring title.

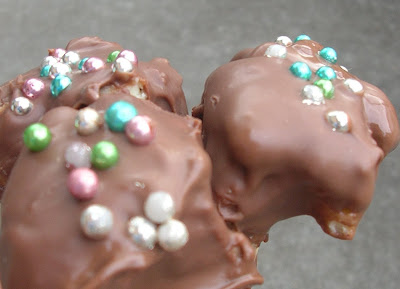
this month's challenge was cheesecake pops. now, i have two confessions to make. firstly i absolutely love cheesecake. really. totally. secondly, and this is more shocking, i'm not really that big a fan of chocolate. i've grown to like it more over the years, and if it's put before me i'll eat it, but i've never really understood what the fuss was. so getting perfectly good cheesecake and covering it in chocolate seemed like a bit of a waste. but i'm reformed. these were just great, i really liked them, but there's story that goes with them, like almost everything i make. but to start off with, here's the official recipe:

Cheesecake Pops

Makes 30 – 40 Pops

5 8-oz. packages cream cheese at room temperature

2 cups sugar

¼ cup all-purpose flour

¼ teaspoon salt

5 large eggs

2 egg yolks

2 teaspoons pure vanilla extract

¼ cup heavy cream

Boiling water as needed

Thirty to forty 8-inch lollipop sticks

1 pound chocolate, finely chopped – you can use all one kind or half and half of dark, milk, or white with 2 tablespoons vegetable shortening

method
Position oven rack in the middle of the oven and preheat to 325 degrees F. Set some water to boil.

In a large bowl, beat together the cream cheese, sugar, flour, and salt until smooth. If using a mixer, mix on low speed. Add the whole eggs and the egg yolks, one at a time, beating well (but still at low speed) after each addition. Beat in the vanilla and cream.

Grease a 10-inch cake pan (not a springform pan), and pour the batter into the cake pan. Place the pan in a larger roasting pan. Fill the roasting pan with the boiling water until it reaches halfway up the sides of the cake pan. Bake until the cheesecake is firm and slightly golden on top, 35 to 45 minutes.

Remove the cheesecake from the water bath and cool to room temperature. Cover the cheesecake with plastic wrap and refrigerate until very cold, at least 3 hours or up to overnight.

When the cheesecake is cold and very firm, scoop the cheesecake into 2-ounce balls and place on a parchment paper-lined baking sheet. Carefully insert a lollipop stick into each cheesecake ball. Freeze the cheesecake pops, uncovered, until very hard, at least 1 – 2 hours.

When the cheesecake pops are frozen and ready for dipping, prepare the chocolate. In the top of a double boiler, set over simmering water, or in a heatproof bowl set over a pot of simmering water, heat half the chocolate and half the shortening, stirring often, until chocolate is melted and chocolate and shortening are combined. Stir until completely smooth. Do not heat the chocolate too much or your chocolate will lose it’s shine after it has dried. Save the rest of the chocolate and shortening for later dipping, or use another type of chocolate for variety.

Quickly dip a frozen cheesecake pop in the melted chocolate, swirling quickly to coat it completely. Shake off any excess into the melted chocolate. If you like, you can now roll the pops quickly in optional decorations. You can also drizzle them with a contrasting color of melted chocolate (dark chocolate drizzled over milk chocolate or white chocolate over dark chocolate, etc.) Place the pop on a clean parchment paper-lined baking sheet to set. Repeat with remaining pops, melting more chocolate and shortening as needed.

Refrigerate the pops for up to 24 hours, until ready to serve.


now: here's where i went wrong. firstly i totally got the weight conversions wrong and came home from the supermarket with not nearly enough cream cheese. not having time to go back i just halved the recipe. the cake took much long to cook than it was supposed to, but i've read lots of comments from other bakers who have had the same problem. so i didn't have enough to scoop out balls, so i cut mine into cubes instead (oh yeah, i was also too impatient to turn out the cake so it hadn't set probably, so about a quarter of that was just eaten straight away, can you see my number of pops disappearing????)

but the rest went into the freezer nicely. i couldn't find plastic lollypop sticks, although i didn't look too hard, but i'm not a fan of putting plastic stuff in my mouth (sticks, cutlery, that horrible plastic cheese stuff) so i used tooth picks instead.

i was unsure about the shortening in the chocolate, but did it anyway and it did add a crack to the chocolate and didn't change the flavour at all.
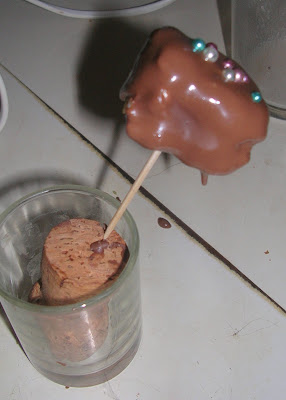
my biggest problem was what to do with the pops as i dipped them. i added some of those funky 1950's-esque metallic cachous on the top, so didn't want to invert them and loose most of the chocolate, and my colour along the way. with the first one dripping in my hand i grabbed what ever way lying around - a champagne cork and a shot glass. not everyone has these things lying around their kitchen, but you probably don't drink as much as i do.

this allowed me to do about four at a time and then rest them for a few seconds before starting again.

if you're making these my advice is to only take a couple out of the freezer at a time anyway. they thaw very quickly and then disintegrate in the melted chocolate.


overall, mistakes of quantity, time and adequate setting locations aside, these were a great success. i actually took the sticks out and served them on a plate. they reminded me of cobbers - the caramel squares covered in chocolate that i was very fond of as a child. and the creamy cake inside the chocolate was really lovely.

if you want to see some fabulous ones, visit Joey Biscotti! these are total works of art. i will certainly be trying these again at some stage and hope to get as fancy as these guys have